Libraries tagged by caret notation
clue/caret-notation
1914 Downloads
^B A dead-simple PHP library to add caret notation in order to safely show strings that contain ASCII control characters (unprintable characters)
inda-hr/php_sdk
269 Downloads
# Introduction **INDA (INtelligent Data Analysis)** is an [Intervieweb](https://www.intervieweb.it/hrm/) AI solution provided as a RESTful API. The INDA pricing model is *credits-based*, which means that a certain number of credits is associated to each API request. Hence, users have to purchase a certain amount of credits (established according to their needs) which will be reduced at each API call. INDA accepts and processes a user's request only if their credits quota is grater than - or, at least, equal to - the number of credits required by that request. To obtain further details on the pricing, please visit our [site](https://inda.ai) or contact us. INDA HR embraces a wide range of functionalities to manage the main elements of a recruitment process: + [**candidate**](https://api.inda.ai/hr/docs/v2/#tag/Resume-Management) (hereafter also referred to as **resume** or **applicant**), or rather a person looking for a job; + [**job advertisement**](https://api.inda.ai/hr/docs/v2/#tag/JobAd-Management) (hereafter also referred to as **job ad**), which is a document that collects all the main information and details about a job vacancy; + [**application**](https://api.inda.ai/hr/docs/v2/#tag/Application-Management), that binds candidates to job ads; it is generated whenever a candidate applies for a job. Each of them has a specific set of methods that grants users the ability to create, read, update and delete the relative documents, plus some special features based on AI approaches (such as *document parsing* or *semantic search*). They can be explored in their respective sections. Data about the listed document types can be enriched by connecting them to other INDA supported entities, such as [**companies**](https://api.inda.ai/hr/docs/v2/#tag/Company-Management) and [**universities**](https://api.inda.ai/hr/docs/v2/#tag/Universities), so that recruiters may get a better and more detailed idea on the candidates' experiences and acquired skills. All the functionalities mentioned above are meant to help recruiters during the talent acquisition process, by exploiting the power of AI systems. Among the advantages a recruiter has by using this kind of systems, tackling the bias problem is surely one of the most relevant. Bias in recruitment is a serious issue that affect both recruiters and candidates, since it may cause wrong hiring decisions. As we care a lot about this problem, we are constantly working on reduce the bias in original data so that INDA results may be as fair as possible. As of now, in order to tackle the bias issue, INDA automatically ignores specific fields (such as name, gender, age and nationality) during the initial processing of each candidate data. Furthermore, we decided to let users collect data of various types, including personal or sensitive details, but we do not allow their usage if it is different from statistical purposes; our aim is to discourage recruiters from focusing on candidates' personal information, and to put their attention on the candidate's skills and abilities. We want to help recruiters to prevent any kind of bias while searching for the most valuable candidates they really need. The following documentation is addressed both to developers, in order to provide all technical details for INDA integration, and to managers, to guide them in the exploration of the implementation possibilities. The host of the API is [https://api.inda.ai/hr/v2/](https://api.inda.ai/hr/v2/). We recommend to check the API version and build (displayed near the documentation title). You can contact us at [email protected] in case of problems, suggestions, or particular needs. The search panel on the left can be used to navigate through the documentation and provides an overview of the API structure. On the right, you can find (*i*) the url of the method, (*ii*) an example of request body (if present), and (*iii*) an example of response for each response code. Finally, in the central section of each API method, you can find (*i*) a general description of the purpose of the method, (*ii*) details on parameters and request body schema (if present), and (*iii*) details on response schema, error models, and error codes.
lochmueller/autoloader
278502 Downloads
Automatic components loading of ExtBase extensions to get more time for coffee in the company ;) This ext is not a PHP SPL autoloader or class loader - it is better! Loads CommandController, Xclass, Hooks, FlexForms, Slots, TypoScript, TypeConverter, BackendLayouts and take care of createing needed templates, TCA configuration or translations at the right location.
briqpay/php-sdk
8807 Downloads
This is the API documentation for Briqpay. You can find out more about us and our offering at our website [https://briqpay.com](https://briqpay.com) In order to get credentials to the playgrund API Please register at [https://app.briqpay.com](https://app.briqpay.com) # Introduction Briqpay Checkout is an inline checkout solution for your b2b ecommerce. Briqpay Checkout gives you the flexibility of controlling your payment methods and credit rules while optimizing the UX for your customers # SDKs Briqpay offers standard SDKs to PHP and .NET based on these swagger definitions. You can download them respively or use our swagger defintitions to codegen your own versions. #### For .NET `` Install-Package Briqpay `` #### For PHP `` composer require briqpay/php-sdk `` # Standard use-case As a first step of integration you will need to create a checkout session. \n\nIn this session you provide Briqpay with the basic information necessary. In the response from briqpay you will recieve a htmlsnippet that is to be inserted into your frontend. The snippet provided by briqpay will render an iframe where the user will complete the purchase. Once completed, briqpay will redirect the customer to a confirmation page that you have defined. 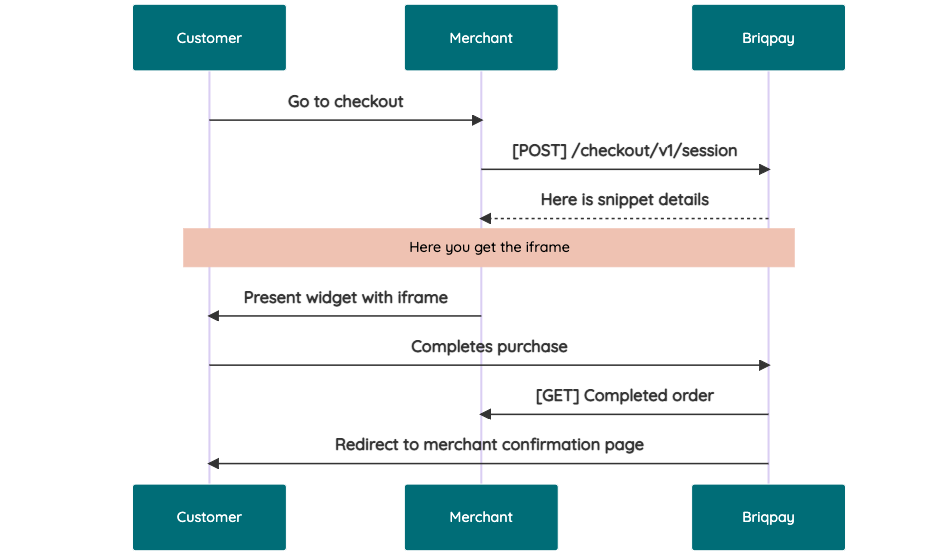 # JavaScript SDK The first step of integration is to add our JS to your site just before closing the ```` tag. This ensures that our JS library is avaliable to load the checkout. ```` Briqpay offers a few methods avaliable through our Javascript SDK. The library is added by our iframe and is avalable on ``window._briqpay`` If you offer the posibility to update the cart or order amonts on the checkout page, the JS library will help you. If your store charges the customer different costs and fees depening on their shipping location, you can listen to the ``addressupdate``event in order to re-calculate the total cost. ```javascript window._briqpay.subscribe('addressupdate', function (data) { console.log(data) }) ``` If your frontend needs to perform an action whe the signup has completed, listen to the ``signup_finalized`` event. ```javascript window._briqpay.subscribe('signup_finalized', function (status) { // redirect or handle status 'success' / 'failure' }) ``` If you allow customers to change the total cart value, you can utilise the JS library to suspend the iframe while you perform a backen update call towards our services. As described below: 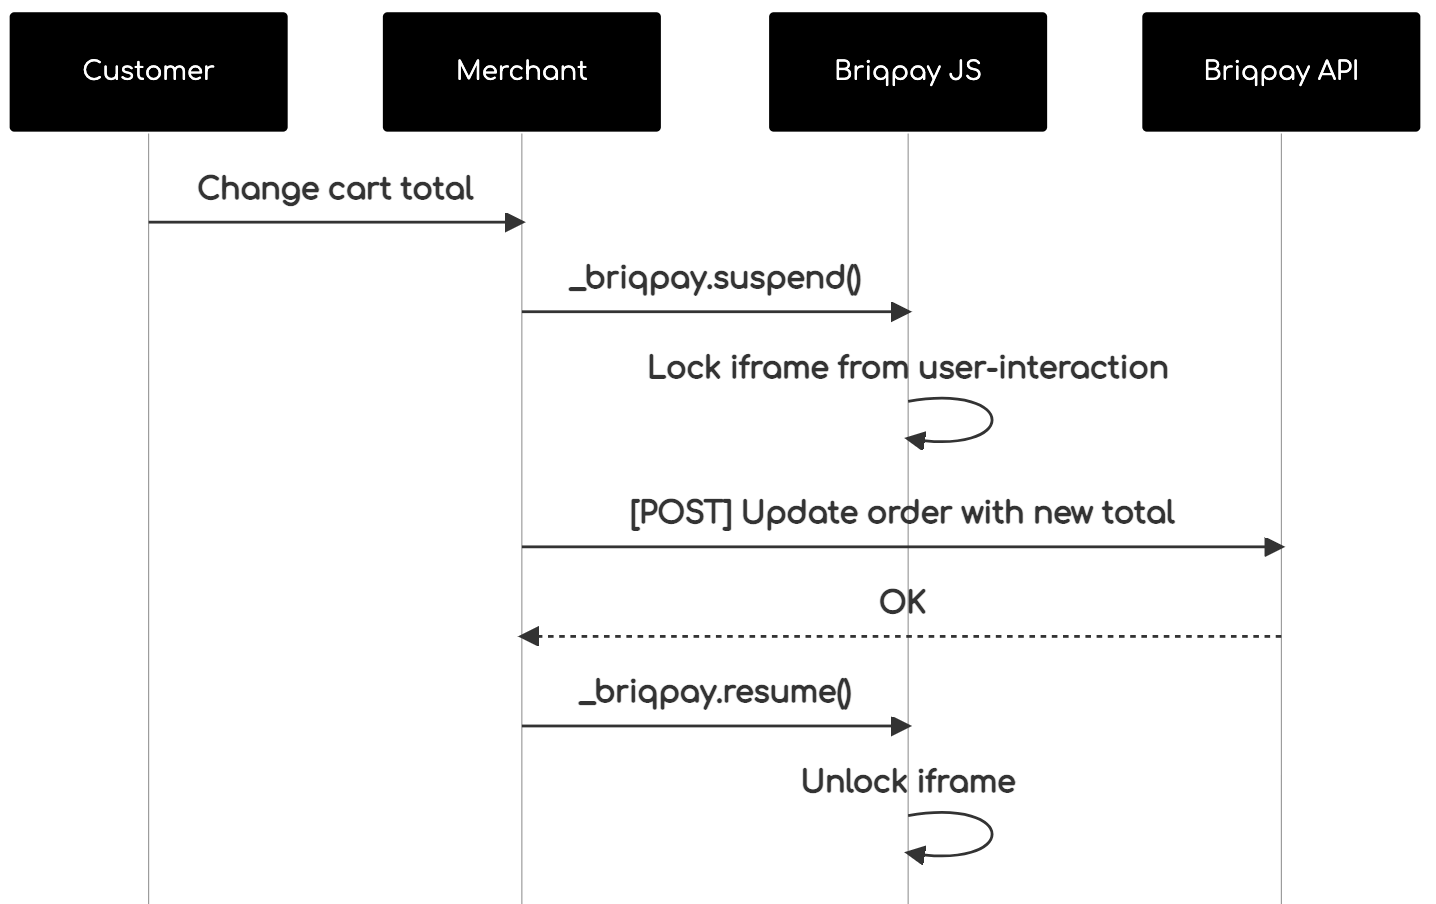 The iframe will auto-resume after 7 seconds if you dont call ``_briqpay.resume()`` before # Test Data In order to verify your integration you will neeed to use test data towards our credit engine. ## Company identication numbers * 1111111111 - To recieve a high credit scoring company ( 100 in rating) * 2222222222 - To test the enviournment with a bad credit scoring company (10 in rating) ## Card details In our playground setup your account is by default setup with a Stripe integration. In order to test out the card form you can use the below card numbers: * 4000002500003155 - To mock 3ds authentication window * 4000000000000069 Charge is declined with an expired_card code. You can use any valid expiry and CVC code # Authentication Briqpay utilizes JWT in order to authenticate calls to our platform. Authentication tokens expire after 48 hours, and at that point you can generate a new token for the given resource using the ``/auth`` endpoint. - Basic Auth - only used on the auth endpoint in order to get the Bearer Token - JWT Bearer Token - All calls towards the API utlizes this method"
dgafka/authorization-security
16 Downloads
Take care of authorization concerns for you. Takes out security out of your domain logic and provides clean and easy API to do it.
fsesini/ml-developer-test
2 Downloads
Block product from being added to the cart based on user's location.
tungsten/growdough
109 Downloads
This plugin allows collecting donation designations in a Donations List that works similar to a shopping cart.
m-michalis/boxnow-api
13 Downloads
Document describes the API description for partners in order to create and track delivery requests. ## Revision history |Date|Author|Description|Version| |-|-|-|-| |2022-09-22|Šmolík, J.|Add accepted-to-locker parcel event |1.40| |2022-09-08|Šmolík J.| Add support for user to choose partner they want to work with |1.39| |2022-08-10|Šmolík J.| Add /labels:search to download PDF labels for defined criteria |1.38| |2022-08-08|Azizov. J.| Add `region` field to /destinations and /origins endpoints |1.37| |2022-07-27|Vala J.| Add EP for listing shipping label data of parcels order /api/v1/delivery-requests/{orderNumber}/label |1.36| |2022-07-27|Vala J.| Add EP for listing shipping label data of parcel /api/v1/parcels/{id}/label |1.35| |2022-07-22|Vala J.| Add destination_public_id column to csv export of parcels |1.34| |2022-07-08|Vala J.| Add exportCsvUrl to headers ['X-export-url-csv'] to response from /api/v1/parcelsAdd endpoint to export parcels to csv file /ui/v1/parcels.csv |1.33| |2022-06-27|Vala J.| Add width and printerModel query parameters for zpl shipping labels for /api/v1/delivery-requests/{orderNumber}/label.{type} and /api/v1/parcels/{id}/label.{type} |1.32| |2022-06-17|Šmolík, J.| Allow to select return location for delivery request |1.31| |2022-05-25|Vala, J.| Add single labelUrlPdf to headers ['X-labels-url-pdf'] in response from /api/v1/delivery-requests:fromCsv |1.30| |2022-05-25|Vala, J.| Add EP to handle csv import orders printing of shipping label /ui/v1/delivery-requests/{orderImportsNumber}/label.pdf |1.29| |2022-05-20|Vala, J.| Add possibility to overwrite 4 rows in shipping label sender info to /api/v1/delivery-requests endpoint |1.28| |2022-05-04|Azizov, J.| Add state and created filters to to /api/v1/parcels endpoint |1.27| |2022-05-03|Azizov, J.| Add possibility to search parcels to /api/v1/parcels endpoint |1.26| |2022-04-27|Azizov, J.| Add /api/v1/delivery-requests:customerReturns for customer returns delivery requests |1.25| |2022-04-26|Vala, J.| Add createTime, updateTime to parcel list response |1.24| |2022-04-21|Šmolík, J.| Add payment info to parcels |1.23| |2022-02-22|Azizov, J.| Add P408 and P409 error codes |1.22| |2022-02-22|Azizov, J.| Add notifySMSOnAccepted to DeliveryRequest |1.21| |2022-02-01|Šmolík, J.| Add check address delivery endpointAdd /api/v1/simple-delivery-requests for simpler delivery creation |1.20| |2022-01-20|Šmolík, J.| Add P405, P406 and P407 error codes |1.19| |2022-01-10|Šmolík, J.| Add CSV import endpointAdd JWT custom claims descriptionMove 403 error codes to own section |1.18| |2021-12-23|Šmolík, J.| Add new endpoint to confirm AnyAPM delivery of a parcelPartition error codes by HTTP status response |1.17| |2021-12-16|Šmolík, J.| Add new error code P403 |1.16| |2021-12-09|Šmolík, J.| Add new error codes P401, P402 |1.15| |2021-11-30|Šmolík, J.| Add delivery request origin, destination and items fields description |1.14| |2021-11-11|Šmolík, J.| Add endpoint for parcel delivery cancellation |1.13| |2021-11-09|Šmolík, J.| Add X403 error code spec |1.12| |2021-10-14|Šmolík, J.| Add Accepted for return event |1.11| |2021-10-05|Šmolík, J.| Make DeliveryRequest.items required |1.10| |2021-09-22|Šmolík, J.| Add canceled event state and event|1.9| |2021-09-17|Šmolík, J.| Add PDF label URLs to parcels response |1.8 |2021-09-13|Šmolík, J.| Update parcel state enum valuesRemove history event displayName, add type|1.7 |2021-08-25|Azizov, J.| Add possibility to print labels for all parcels in orderMake contact information of origin optional in delivery request|1.6 |2021-08-02|Azizov, J.| Add items metadata to parcel |1.5| |2021-07-15|Šmolík, J.| Add destination expected delivery time |1.4| |2021-06-23|Šmolík, J.| Update money value fields description |1.3| |2021-06-21|Šmolík, J.| Update Requesting a delivery textAdd `name` filter to origins and destinations Rename delivery request code of description to plain descriptionAdd more specific info to value amount fieldsUpdate address country to match ISO CodeUpdate address postal code formattingUpdate origin/destination for delivery requestRemove height, length, width from order itemAdd events to parcel infoUpdate delivery request responseUpdate order number descriptionAdd parcel id filter to /parcelsAdd message to errorMake contact name requiredAdd delivery partner parcel idsRemove order items' code and status |1.2| |2021-06-14|Šmolík, J.| Add a todo to specify client notification type after accepting the order. Let the partner choose to receive an email when successful delivery request is made. Remove `typeOfOrder` from delivery request.Add option to select delivery partner for pickupMake item weight in the order optionalMake origin contact email requiredAdd support to add sender's name when making delivery requestRemove landmark and code from addressAdd new error code or partners not eligible to create COD delivery requestsAdd support to filter destinations/origins by typeAdd support to send compartment size for order item, required for APM originMake `typeOfService` optional |1.1| |2021-06-09|Šmolík, J.|Initial version|1.0| # Setup Register your company through our support. We are going to need - Company name - List of Phone numbers for SMS OTP authentication of people who'll you want to have access to the Partner CMS - List of addresses for pickup points - where do we pickup your order for delivery You will get in return - `OAUTH_CLIENT_ID` - OAuth2 Client ID for authenticating with the Partner API. Keep it safe. Value may vary for each environment. - `OAUTH_CLIENT_SECRET` - OAuth2 Client Secret for authenticating with the Partner API. Keep it safe. Value may vary for each environment. - `API_URL` - Base URL for Partner API ## Environments Product offers multiple environments - Sandbox - For you to test the integration. Limited functionality. - Production - Connected to real end-users. Use with care. Environment setting summary: | Value \ Env | Sandbox | Production | |---|---|---| | `API_URL` | N/A | N/A | | `OAUTH_CLIENT_SECRET` | Contact Support | Contact Support | | `OAUTH_CLIENT_ID` | Contact Support | Contact Support | # API ## Authentication Authentication is based on OAuth2 standard, Client Credentials grant. Token endpoint `/auth-sessions`, see examples below. Client ID and Secret MUST be passed to you from BoxNow support in advance. In order to use the API, you MUST attach the access token to Authorization header as a Bearer token. ### Custom JWT claims You can find additional user information in custom claims under namespace key `https://boxnow.gr`. For example ```json { "iat": 1641980553, "exp": 1641984153, "https://boxnow.gr": { "permission": { "warehouseAsOrigin": true, "anyApmAsOrigin": true, "anyApmToSameApmDelivery": true, "anyApmToSameApmDeliveryWithoutConfirmation": true, "depotAsOrigin": true } } } ``` ## Listing available destinations You can skip this if you don't want to deliver your order to one of our APMs. Use `/destinations` to list available APM locations we can deliver the goods to. You will refer to these records by `id` when requesting delivery later on. ## Requesting a delivery Create a delivery request to delivery your order to the client. Use `/delivery-requests` endpoint for this operation. Once a successful request delivery is made - (optional) we send you an email notifying about successful delivery request creation, if you choose to receive this email - you should fetch the PDF label for each of the parcel from `/parcels/{id}/label.pdf`, print it and stick it to the parcel/s - we send a courier to pick up the labeled parcel/s - we notify the client via email that we have accepted the order from you and its being delivered by us ## Modifying a delivery request After a delivery request is successfully made, you can alter some parts of it later on. Use `/delivery-requests/{id}` endpoint for these modifications. ## Checking on the deliveries You can list parcel related to your delivery requests via `/parcels` endpoint. ## Error codes ### Description of codes for `400 Unprocessable entity` responses - `P400` - Invalid request data. Make sure are sending the request according to this documentation. - `P401` - Invalid request origin location reference. Make sure you are referencing a valid location ID from Origins endpoint or valid address. - `P402` - Invalid request destination location reference. Make sure you are referencing a valid location ID from Destinations endpoint or valid address. - `P403` - You are not allowed to use AnyAPM-SameAPM delivery. Contact support if you believe this is a mistake. - `P404` - Invalid import CSV. See error contents for additional info. - `P405` - Invalid phone number. Make sure you are sending the phone number in full international format, e.g. +30 xx x xxx xxxx. - `P406` - Invalid compartment/parcel size. Make sure you are sending one of required sizes 1, 2 or 3. Size is required when sending from AnyAPM directly. - `P407` - Invalid country code. Make sure you are sending country code in ISO 3166-1 alpha-2 format, e.g. GR. - `P408` - Invalid amountToBeCollected amount. Make sure you are sending amount in the valid range of (0, 5000> - `P409` - Invalid delivery partner reference. Make sure you are referencing a valid delivery partner ID from Delivery partners endpoint. - `P410` - Order number conflict. You are trying to create a delivery request for order ID that has already been created. Choose another order id. - `P411` - You are not eligible to use Cash-on-delivery payment type. Use another payment type or contact our support. - `P412` - You are not allowed to create customer returns deliveries. Contact support if you believe this is a mistake. - `P413` - Invalid return location reference. Make sure you are referencing a valid location warehouse ID from Origins endpoint or valid address. - `P420` - Parcel not ready for cancel. You can cancel only new, undelivered, or parcels that are not returned or lost. Make sure parcel is in transit and try again. - `P430` - Parcel not ready for AnyAPM confirmation. Parcel is probably already confirmed or being delivered. Contact support if you believe this is a mistake. ### Description of codes for `403 Forbidden` responses - `X403` - Account disabled. Your account had been disabled, contact support. - `P414` - Unauthorized parcel access. You are trying to access information to parcel/s that don't belong to you. Make sure you are requesting information for parcels you have access to. ### Description of codes for `503 Service Unavailable` responses | Code | Description | |---|---| | `P600` | Locker bridge communication failed. There has been some error when communicating with the locker bridge. Try again later or contact support. | | `P610` | Geolocation API failed. There has been some error when translating address to gps coordinates. Try again later or contact support. |